Raspberry Pi Pico W には Wi-Fi 機能が搭載されており、通常は既存のルーターに接続する「ステーションモード」で利用します。しかし実は アクセスポイント(AP)モード としても利用でき、Pico W 自身が Wi-Fi の親機となり、スマートフォンやPCを直接接続して制御が可能です。
アクセスポイント(AP)モードの特徴
- ネットワークルーター不要(Pico W が親機になる)
- スマホやPCを直接接続して制御可能
- 小規模 IoT システムや展示デモに最適
- Wi-Fiのない環境(屋外、現場作業、教育用)でも利用できる
APモードでは、ネットワークルーターは不要です。Raspi Pico W自身をアクセスポイントとして設定することで、Wi-Fi対応デバイス(スマートフォン、ノートPCなど)を、ルーターを介さずにRaspi Pico Wに接続できるようになります。
import network
import gc
import time

# スマートフォンやパソコンからこのアクセスポイントに接続できます。
# 接続後、出力に表示されたIPアドレスを使ってデバイスにアクセスできます。
SSID: str = "Raspi_Pico_W"
PASSWORD: str = "qwertyuiop"

gc.collect()  # メモリを解放するためにガベージコレクションを実行

# アクセスポイントのインターフェースを作成
ap = network.WLAN(network.AP_IF)

# secrets.py に定義されたSSIDとパスワードでアクセスポイントを設定
ap.config(essid=SSID, password=PASSWORD)

# 静的IPアドレスを設定:(IPアドレス, サブネットマスク, ゲートウェイ, DNS)
ap.ifconfig(("192.168.4.1", "255.255.255.0", "192.168.4.1", "192.168.4.2"))

# アクセスポイントを有効化して、他のデバイスから見えるようにする
ap.active(True)

# ネットワーク設定を表示
print("アクセスポイントの準備ができました。以下の情報で接続してください:")
print("IPアドレス: {}\nサブネットマスク: {}\nゲートウェイ: {}\nDNS: {}".format(*ap.ifconfig()))

# アクセスポイントを維持するためにスクリプトを動作させ続ける
while True:
    time.sleep(1)  # CPU使用率が高くならないようにスリープ
これでスマホやPCから SSID=Raspi_Pico_W に接続し、ブラウザで 192.168.4.1 にアクセスできます。
⚠️ 注意点
- セキュリティを考慮し、SSIDとパスワードは必ず変更してください。
- APモードはインターネット共有ではなく、あくまで「Picoと端末を直接つなぐ仕組み」です。
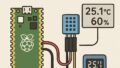
APモードの活用例1:本体温度のWeb表示
APモードを使うと、センサー値をリアルタイムにブラウザ表示できます。以下は Pico W の内蔵温度センサーを利用し、Webサーバーを立ち上げてグラフ化する例です。
- 5秒ごとにページが更新
- JavaScriptで簡易グラフ描画
- 温度履歴(直近20件)を可視化
これは「簡易IoTダッシュボード」として活用でき、温湿度センサーや照度センサーに置き換えれば、現場モニタリングにも応用可能です。LAN不要で動作するので、出張先や展示会でも利用しやすいのが利点です。
# このスクリプトは Raspberry Pi Pico W を Wi-Fi アクセスポイント(AP)として動作させ、
# 内蔵温度センサーの値を Web ブラウザに表示する簡単な HTTP サーバーを起動します。

import network     # Wi-Fi 通信を行うためのモジュール
import socket      # ソケット通信(HTTPサーバー)用モジュール
import gc          # メモリ解放用のガベージコレクションモジュール
import time        # 遅延処理用
from machine import ADC  # Pico W のアナログセンサー読み取り用(温度センサー)

# ====== Wi-Fi アクセスポイントの設定 ======
SSID = "Raspi_Pico_W"
PASSWORD = "qwertyuiop"

gc.collect()  # メモリを少しでも確保するためにガベージコレクションを実行

# アクセスポイントモードでWi-Fiインターフェースを作成
ap = network.WLAN(network.AP_IF)

# アクセスポイントとしてのSSIDとパスワードを設定
ap.config(essid=SSID, password=PASSWORD)

# アクセスポイントのIPアドレスなどを手動で設定(固定IP)
ap.ifconfig(("192.168.4.1", "255.255.255.0", "192.168.4.1", "192.168.4.2"))

# アクセスポイントを有効化(他の端末から見えるようにする)
ap.active(True)

# コンソールにネットワーク設定を表示
print("Access Point is ready. Connect from your device:")
print("IP Address: {}\nNet Mask: {}\nGateway: {}\nDNS: {}".format(*ap.ifconfig()))

# ====== 内蔵温度センサーの設定 ======
# 内蔵温度センサーは ADC(4) に接続されている
sensor_temp = ADC(4)
# ADCの読み取り値(0~65535)を電圧(0~3.3V)に変換する係数
conversion_factor = 3.3 / 65535

# 温度を読み取り摂氏に変換する関数
def read_temperature():
    ### ADC から現在の電圧を読み取る
    reading = sensor_temp.read_u16() * conversion_factor  # ADC値を電圧に変換
    ### RP2040 データシートに基づく温度換算式(摂氏温度に変換)
    temperature_c = 27 - (reading - 0.706) / 0.001721
    return round(temperature_c, 1)  # 小数第1位まで丸めて返す

# 温度履歴のリスト (最大 20 件)
history = []

# ====== HTTP サーバーの設定 ======
# サーバーのIPアドレスとポート番号を取得(ポート80でリッスン)
addr = socket.getaddrinfo("0.0.0.0", 80)[0][-1]

# ソケットを作成し、接続要求を受け付けられるようにする
server_socket = socket.socket()
server_socket.bind(addr)     # ソケットをアドレスにバインド
server_socket.listen(1)      # 同時接続は1台まで受け付け

print("HTTP server running at http://192.168.4.1")

# ====== メインループ:温度を表示するWebページを提供 ======
while True:
    ### 現在の温度を取得
    temperature = read_temperature()
    ### 履歴に温度を追加
    history.append(temperature)
    ### 履歴が20件を超えた場合、古いデータを削除
    if len(history) > 20:
        history.pop(0)  # 最新20件だけ残す

    try:
        ### クライアントからの接続要求を待つ
        client, addr = server_socket.accept()
        print("Client connected from", addr)
        request = client.recv(1024)  # クライアントからのリクエストを受信

        ### 温度履歴を JavaScript の配列形式に変換
        js_data = ','.join(str(t) for t in history)

        ### クライアントに返す HTML を作成
        html = f"""\
HTTP/1.1 200 OK

<!DOCTYPE html>
<html>
<head>
    <title>Pico Temperature History</title>
    <meta http-equiv="refresh" content="5">
    <style>
        body {{
            font-family: sans-serif;
            text-align: center;
            margin-top: 40px;
        }}
        canvas {{
            border: 1px solid #ccc;
        }}
    </style>
</head>
<body>
    <h1>Temperature History</h1>
    <p>Current Temperature: <strong>{temperature:.1f} degree C</strong></p>
    <canvas id="chart" width="300" height="150"></canvas>
    <script>
        // JavaScript でグラフ描画を行う部分
        const data = [{js_data}];
        const canvas = document.getElementById('chart');
        const ctx = canvas.getContext('2d');
        ctx.clearRect(0, 0, canvas.width, canvas.height);
        ctx.beginPath();
        ctx.strokeStyle = 'blue';

        let max = Math.max(...data);
        let min = Math.min(...data);
        let range = max - min || 1;
        let scaleX = canvas.width / (data.length - 1);
        let scaleY = canvas.height / range;

        for (let i = 0; i < data.length; i++) {{
            let x = i * scaleX;
            let y = canvas.height - (data[i] - min) * scaleY;
            if (i === 0) {{
                ctx.moveTo(x, y);
            }} else {{
                ctx.lineTo(x, y);
            }}
        }}
        ctx.stroke();
    </script>
    <p>(Graph updates every 5 seconds)</p>
</body>
</html>
"""
        ### クライアントに HTML を送信
        client.send(html)
        client.close()

    except Exception as e:
        ### エラーが発生した場合の処理
        print("Error:", e)
        client.close()
APモードの活用例2:LEDをWeb操作
次に、内蔵LEDをON/OFFできるWebインターフェースの例です。ブラウザからボタンを押すと、即座にPicoのLEDが点灯/消灯します。
- HTMLボタンを押す → HTTPリクエスト → Picoで受信 → GPIO制御
- 背景色を変えて状態をわかりやすく表示
教育現場やIoT入門のハンズオンで「Webからモノが動く」体験を簡単に提供できます。
import network
import socket
import gc
import machine

# ====== Wi-Fi アクセスポイント設定 ======
SSID = "Raspi_Pico_W"
PASSWORD = "qwertyuiop"

gc.collect()

ap = network.WLAN(network.AP_IF)
ap.config(essid=SSID, password=PASSWORD)
ap.ifconfig(("192.168.4.1", "255.255.255.0", "192.168.4.1", "192.168.4.2"))
ap.active(True)

print("Access Point is ready. Connect from your device:")
print("IP Address: {}\nNet Mask: {}\nGateway: {}\nDNS: {}".format(*ap.ifconfig()))

# HTMLでウェブページを作成
html = """
<!DOCTYPE html>
<html>
<head>
  <meta charset="utf-8">
  <meta name="viewport" content="width=device-width, initial-scale=1">
  <style>
    html {
      font-family: Helvetica;
      text-align: center;
    }
    button {
      color: white;
      padding: 15px 32px;
      font-size: 18px;
      margin: 3px 1px;
      cursor: pointer;
      border: none;
      border-radius: 5px;
    }
    .green { background-color: #00BFFF; }
    .red { background-color: #f44336; }
    button, form { display: inline-block; text-align: center; }
  </style>
</head>
<body style="%s">
  <h2>LED Control</h2>
  <form>
    <button class="green" name="led" value="on" type="submit">LED ON</button>
    <button class="red" name="led" value="off" type="submit">LED OFF</button>
  </form>
  <p>%s</p>
</body>
</html>
"""

# LEDのピンを設定
led = machine.Pin("LED", machine.Pin.OUT)

# LEDの状態を初期化
ledState = "LED State Unknown"

# ソケットの設定を開始
addr = socket.getaddrinfo("0.0.0.0", 80)[0][-1]
s = socket.socket()
s.setsockopt(socket.SOL_SOCKET, socket.SO_REUSEADDR, 1)
s.bind(addr)
s.listen(1)

# クライアントからの接続を待つ
while True:
    try:
        # クライアントからの接続を受け付ける
        cl, addr = s.accept()
        print("client connected from", addr)
        # クライアントからのリクエストを受け取る
        request = cl.recv(1024).decode()

        # LED制御
        if "?led=on" in request:
            led.on()
            print("LED ON")
        elif "?led=off" in request:
            led.off()
            print("LED OFF")


        # LEDの現在の状態を設定
       # ledState = "LED is OFF" if led.value() == 0 else "LED is ON"
        if led.value() == 0:
            ledState = "LED is OFF"
            bgColor = "background-color: #FFCCCC;"  # LED OFFなら薄赤
        else:
            ledState = "LED is ON"
            bgColor = "background-color: #CCFFCC;"  # LED ONなら薄緑


        # レスポンスを作成し、クライアントに送信
        response = "HTTP/1.0 200 OK\r\nContent-type: text/html\r\n\r\n" + (html % (bgColor, ledState))
        cl.send(response)
        cl.close()

    # エラーが発生した場合、クライアントとの接続を閉じる
    except OSError as e:
        cl.close()
        print("Connection closed. Error:", e)
まとめ
Raspberry Pi Pico W の APモードは、Wi-Fiルーターが不要で閉じた環境でもWebブラウザ経由で制御できる非常に便利な機能です。センサー監視やLED制御のようなシンプルな用途だけでなく、教育、展示、実証実験など幅広いシーンで活躍します。
「小さなIoT機器をネットなしで動かす」──そんな場面では、ぜひこのAPモードを試してみてください。
参考にさせていただいたサイトです。


コメント